Greengate Ranch Remodel
Remodeling a Daylight Ranch in Oregon

Sunday, December 31, 2006

Remodeled Master Bath

We completed the remodel of the master bath, closet and guest bath last spring.
  • Both the master bath and closet doubled in size, using the guest bath space for it.
  • The guest bath was moved to the old hallway, and a 2" x 9" piece of the office was taken to do it.

We worked to keep the same overall footprint for the structual walls, this helped keep the cost down. We removed a wall that was mostly pocket door, moved the guest bath wall over slightly, and added doorways.


The former master bath was only 7" x 8", and both baths were extremely dated.


Now the master is 8" x 14" and closet is 6" x 14".

What really made the difference:

  • Added the Jacuzzi tub
  • Added the window overlooking the forest
  • Heated floor (Suntouch)
  • Stone sinks
  • 200 sf of tile and mosaic slate
  • Textured paint on the walls
  • Oil-rubbed brass fixtures


Click on the title link or here for the full photo set.

Saturday, December 30, 2006

Pellet Stove

Here is picture of the pellet stove we installed two years ago. This is our third winter with it, and we still love it. The mantle is made of alder. The tile is porcelain that looks like tumbled stone.

The stove is in the corner of our basement and pretty much heats the entire house, other than the initial warm-up by the heat pump in the mornings.


We have not done much with this space, other than the stove. Eventually, this is going to be a comfortable space for reading and conversation, with built in bookshelves.


Click on the title link for the construction sequence photos

Friday, December 29, 2006

Master Bedroom Furniture

I built this four-poster bed and armoire about four years ago (shown in our old house). This was my first venture into "romantic" furniture as opposed to designs based on arts & crafts. My DW really likes french country style, and this seemed to be a good fit. She made the toile bed covers, which still look new.

I basically scaled a picture out of the Ballard catalog to get the design and dimensions. I built the end tables out of the left over wood with a simple matching design.

I designed this armoire myself. I wanted one that had full-length doors, giving it an older look. This one has a maple interior, with fixed shelves. It is purely for storage - no TV.

Click on the title link for the full set of photos

Sunday, December 24, 2006

Adding a Tray Ceiling to the Master Bedroom

The entire house has standard 8 ft ceilings: no variation, crown molding, etc. Pretty typical for a 1970's ranch house.

In our last home, and in many of the "inspiration" houses we have looked at, the master bedroom has an elevated tray ceiling (also called a box ceiling) - so we decided to add one. My first thoughts were on how we could raise the ceiling and get a 9 foot center. That would have meant re-engineering the roof trusses, tearing everything out, and doing some signficant refraiming. We like the look, but it was not worth that level of effort.

In a number of the new homes they are building in the area, they are sticking with an 8 foot ceiling upstairs, and creating the tray with 2x6 soffits. I decided this was a pretty simple way to get it done. Since we already had a ceiling up, I built the units out of 2x4, plus an additional 1x3 to function as a flange for attaching to the ceiling trusses.

Here is a cross-section:

These were glued and screwed together, then attached to the ceiling as shown here. The 1x3 flanges allowed for easy nailing to get them up there. I added 2 1/2 screws on both the flange and the outsides. In addition, I used construction adhesive to help minimize movement later on.

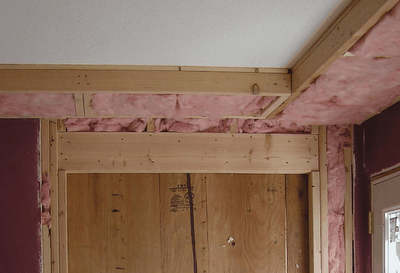
I added insulation to these. The top plate of a room's framing is one of the largest surface areas with no insulation, allowing for "thermal bridging". The heat travels through the wood much easier than insulation. Putting insulation here stops the bridging, plus adds additional ceiling R-value. I took the vapor barrier off, and drilled holes in the ceiling sheetrock to stop condensation from building up.

Here is the sheetrock:


Here is the final product:

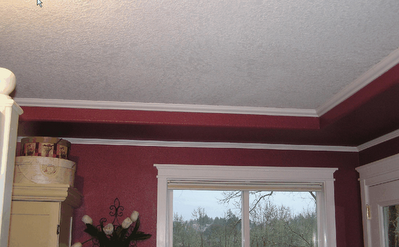
We like in the added design interest this creates, plus it helps to visually "lift" the center part of the ceiling.

Problem Maintaining Clean Lines

So far the exterior doors we have put in the house have ended up being between 3/4 and 1 1/2 inches shorter than the interior doors and windows. The old ones we took out had the same problem as well.

I was not willing to cut the rough sill and drop the height of the window to match, since it lined up with the other interior doors in the room. Also, I didn't want to set the french door any higher - I already had put a 1/2 inch piece of plywood under the threshhold. Putting it any higher would make it a trip hazard and akward.

Here is a close-up picture of the problem:


I could fiddle with the trim reveal to get an additional 1/4 closer, but they would still be 1 1/4 off. If the top trim pieces to came together at different hieghts in the corner, it would look like an amatuer job. After thinking about it for a day, here is what I came up with.


  • Trim out the window
  • Trim out the door, matching the top height to the window, leaving a gap
  • Fill in the gap with a filler strip that is cut and inset to match the other 1/4 reveals on the trim

Visually, this gives a nice clean top line. Also, the filler strip is mirrored by the bracket for the blinds in the window. This balance makes it look natural.

Design concept: Keep the horizontal lines at the same level (clean). Fill in as needed, making the fillers simple and inset.

Detail on eHow:

Friday, December 22, 2006

Master Bedroom Design Concept

Here is the layout with the design diagram for the master bedroom (click on the picture for the flickr view).

Space:
  • A bedroom, for the most part, should be private / personal space.
  • We added public space by lining up the french door into the bedroom with the new window. This allows a view from the living room through the bedroom to outside when the doors are open. We made the window and the door the same width for symmetry. Having our bed behind the door, lets us keep the door open without seeing it
  • A reclining chair by the window makes a private space for looking outside and reading
Transitions:
  • Both transitions are done with double french doors with glass.
  • When the bedroom door is closed, it makes a nice looking focal point in the room, when open it gives the views
  • When open, the french door out to the deck and the new window make the room feel as if its an open porch, overseeing the forest.

Light and Views:

  • Adding the window puts light into the room on two walls, creating a much more bright feeling.
  • The new window faces directly east, allowing us to see the sunrise over the trees in the morning, the forest during the day and the lights on the hill at night.

Here are the before and after pictures


Master Before Moving In

After Installing New Window, French Doors, Soffits for Tray Ceiling

Design Terms

Having read a number of books on design and architecture, I often find the terms vauge and even confusing. For example, when I read you need to create "rhythm" or a "vernacular" I get lost. That being said, I have found some concepts that make a lot of sense in thinking about design.

Here is my list - these are the terms I have decided to use (sorry if they are not exactly correct to some academic standard). I am not trying to be an architect - I am a high tech engineer - just someone designing my own family's living environment.

Spaces

  • Circulation space - the areas where most movement occurs
  • Functional space - locations that have a purpose and are not just travelled through
  • Transitional space - places between one area and another
  • Public space - where everyone can go
  • Private space - where only a few go
  • Personal space (or retreat space) - where just one person goes

Patterns

  • Symmetry - things set up to be balanced
  • Focal point - the "center piece" of an area
  • Balance - things set up to match each other or have a common theme

Perception

  • Light - how your natural and electric lighting is set up
  • Long view - being able see a long distance in the house, also to the outside
  • Overlooking view - being able to look down on an area

Layout - How you put all of the above together...

This is a rough concept drawing for setting up an area:

All of this allows me to think critically about the remodeling choices we make.

Changing Access to the Master Bedroom

The key to renovating the bedroom zone was changing the access to the master bedroom.

By moving the door from the end of the hallway to the living room, it allowed us to use all the hallway area for functional space. Once we moved the bedroom entry, the rest of the changes we wanted to do fell into place.

It took us a little time to decide that we would like, or at least not mind, our bedroom door right off the living room. Now that it has been in place for about a year, we are really glad we made this decision. We checked online, and found a number of newer house plans with the master directly off the main area. Also, the way the bedroom is configured, you don't see the bed. Finally, it allows some really nice views which I will discuss later.

Thursday, December 21, 2006

Abandon All Hope, Ye Who Enter Here

This was the reaction (maybe a little exaggeration) of our realtor when she saw the long dark hallway that lead to the master bedroom. She thought it was one of the main reasons that the house had sat on the market for almost a year.

Initially, we didn't really like it, but it wasn't a killer for us either. We thought that in the long run, we could remove the living-room side wall, since the roof is full-span trusses.

After living in the house for a few months, and really thinking about changes we wanted to make, we decided not to move it. We figured out how to incorporate it.


The master is at the end of the hallway

Upstairs we had 3 "zones" of remodeling: the bedrooms, the kitchen, and the central fireplace. The house configuration was such that each could be done independently, with little impact to time or cost. The focus of the following posts will be the bedrooms.

Here is the original bedroom zone plan

Here is the remodeled plan

In this remodel we did not care about resale, although we think the value has gone up a lot. We focused on applying design concepts that create a great home.

Thursday, December 14, 2006

From Box to Home

The house we bought was basically a 1970's vintage box, that has had very little, if anything, done to it in the past 30 years. It had been well maintained, but that's about it. When we looked at it, the colors, furniture, fixtures and applicances - except some cabinet refacing in the kitchen - hadn't changed a bit.

The good existing features of the house:
  • More than 1/2 acre lot, plus an adjacent few acres of land-locked forest and wetlands.
  • Overlook a creek
  • Deer live behind the house.
  • Great in-town location - close to schools
  • Large home (over 3600 sf), but a humble front elevation since its a daylight ranch - no McMansion for us
  • Simple truss construction with only one internal load-bearing wall, allowing re-design flexibility
  • Adult area upstairs, kids area down
  • Fully excavated under the garage to make a 1300 sf family room down stairs
  • Fireplace in the center of the house
  • Large kitchen area
  • Lots of deck space
  • Solar friendly design
  • Good insulation for the time it was built
  • Original owners took good care of the place
  • Two water heaters - split baths on one and kitchen / laundry on the other
  • New 40-year roof

Some of the not-so good things:

  • Low quality kitchen cabinets that were refaced - nice new doors though
  • Very small master bath - 8x7 sf
  • Upper floors out of level in places
  • Long-dark hallways leading to the bedrooms
  • Hardly any closet or storage space
  • Sprinklers shooting into the house everywhere causing dry-rot in some small spots
  • Leaky, tired aluminum windows
  • Harvest gold and power blue tubs, showers, toilets, ...
  • 30 year old heat pump / furnace / water heaters (two of them)
  • Cheap trim and finishing
  • T-1-11 siding with various small problems

So we took the place as a "starting point", and we have started to renovate it into the house we really want. We are not dedicated to restoring it to any period, but to a comfortable style.

Tuesday, December 12, 2006

Remodeled Fireplace

For the next month or so, I will post pictures of the remodeling we have done on the house in the past two years, plus information on the planning and design choices we made.

Here is the fireplace we replaced. (Click here for slideshow)

Before

After

What changed?

  • Better size for the room
  • Added passage on the left - allowing better traffic flow a much longer view in the house
  • Opened passage on the right - opened the entry area
  • New, better stone
  • Mantle
  • Floor-level hearth

Monday, December 11, 2006

New Blog

I am starting a new blog that encompasses all the remodeling we have done and are doing on our daylight ranch house.

Up to this point, I have been tracking our kitchen remodel at 10K kitchen remodel. I will continue to do that, since it's structured to track detailed costs and supplier links.
See my article library on eHow...